Hazelnut Chocolate Praline Spread

img_6257.jpg

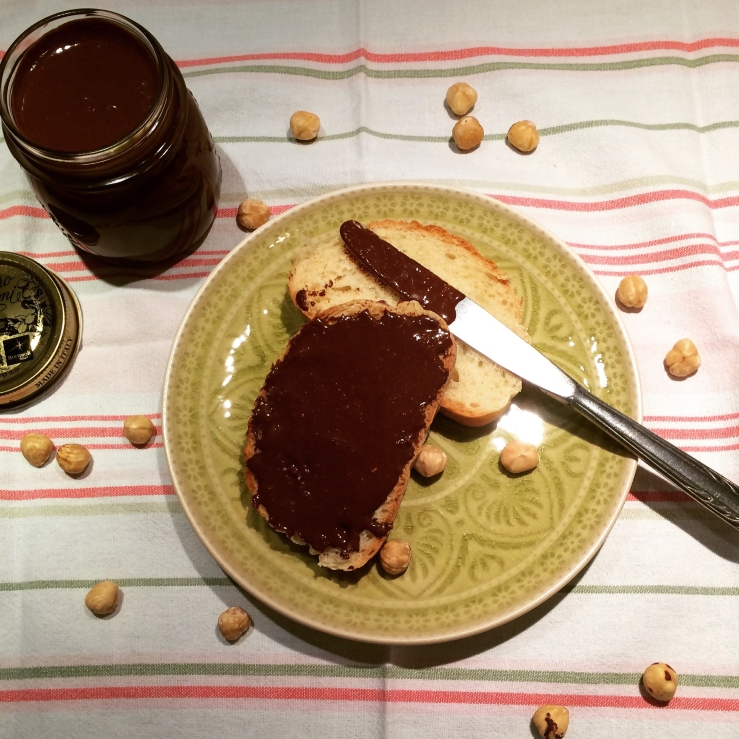
If you have never tried this spread, you can’t imagine what you are missing! You can use it to make all sorts of cakes or cookies and you can drizzle it over absolutely anything! Pancakes, waffles, crepes, ice cream, brownies, the list is endless. It is so good you can even just spread it over some warm bread and enjoy the full, delicious flavor it offers!

Quick! Go try it and let me know what you think…

 Ingredients

  • 400 g roasted hazelnuts
  • 350 g icing sugar or coconut sugar
  • 50 g cocoa powder
  • 80 ml vegetable oil or coconut oil
  • 200 g couverture chocolate, finely chopped

 Instructions

  1. Put the hazelnuts into a food processor.
  2. Add the vegetable oil and process, until the hazelnuts are completely ground.
  3. Stop processing when the hazelnut mixture becomes very thin.
  4. This should take about 3-4 minutes. The mixture should be completely smooth and silky.
  5. At this point add the finely chopped chocolate couverture.
  6. The mixture should be very hot due to the processing, so the chocolate will melt immediately.
  7. Process for another 20 seconds, until the chocolate is completely incorporated.
  8. Add the icing sugar and beat until it dissolves.
  9. You can add anywhere between 250 g – 350 g of icing sugar, depending on how sweet you like your spread. Just be sure to process for 3-5 minutes, until the sugar dissolves completely.
  10. Add the cocoa powder and process again.
  11. Stop, scrape down the sides of the bowl and process again until your mixture is completely combined and velvety smooth.
  12. If you don’t have a large food processor, make half of the recipe or in two batches.
  13. Pour the hazelnut-chocolate praline sauce into a small jar and seal.
  14. It can be stored out of the refrigerator for up to 1-2 months. If refrigerated it can last much longer.

Enjoy!

Greek Halva – Semolina & Orange Pudding

IMG_6185.JPG

Halva is a traditional dessert found in Greece and the Middle East. There are two different versions of Halva. One is made with semolina and oil and the other is made with a mix of either honey and sesame seeds or sesame seed paste and sugar. Here is the recipe for the first version. It contains semolina, orange and spices and it strongly resembles a pudding.

So have you ever had halva before?  If you haven’t here is the recipe…

 img_6183img_6187

Instructions:

  • 1 cup oil (half olive oil, half sunflower oil)
  • 2 cups semolina (half fine, half thick)
  • 3 cups granulated sugar
  • 4 cups water
  • 1 teaspoon cinnamon powder
  • ¼ teaspoon ground cloves
  • 1 orange
  • 150 g walnuts
  • extra water, to boil the orange


Ingredients:

  1. Preheat oven to 180 oC fan.
  2. Boil the orange in a generous amount of water (not the 4 cups of water in the ingredients), for 1 hour. Make sure there is enough water to keep the orange submerged while boiling. Add more water if necessary. Allow to cool. Cut in half, and squeeze. Remove any seeds and puree in a blender. Set aside.
  3. Use a non-stick pot and sauté the semolina and the aromatics in the oil, over medium heat, until it is brown. Be careful not to burn it.
  4. Add the remaining ingredients, (4 cups water, 3 cups sugar) along with the orange puree. Do not add the walnuts. Stir for about 10 minutes, until it thickens.
  5. You will know it’s ready when it starts to pull away on its own from the bottom of the pan (when you tilt the pan a little to the side). When it is ready, add the walnuts and mix. (If it looks like it might burn, lower the heat.)
  6. Press the mixture into a 20 cm cake pan and remove it after 5 minutes! You can it eat hot or cold and you can always add a scoop of vanilla ice cream!

Enjoy!


Oven baked penne with cheese and bacon

IMG_6076.JPG

The past two weeks I had a really hectic schedule, full of presentations, congresses and exams. Although my program was extremely busy I managed to cook something easy and delicious for my family. It took only 30 minutes of my time to create a homemade dish with pasta, rather than ordering something. Here is the recipe for the oven baked penne…please try it and let me know if you liked it or not.

IMG_6080.JPG

Ingredients:

  • 1 tablespoon olive oil
  • 1 onion, finely chopped
  • 1 clove of garlic, thinly sliced
  • 10 sprigs thyme, only the leaves, finely chopped
  • 7 slices bacon, finely chopped
  • 500 g cherry tomatoes, cut in half
  • 100 ml red wine
  • 1 teaspoon salt
  • ½ teaspoon pepper
  • 200 ml water
  • 1 tablespoon tomato paste
  • 500 g penne pasta, boiled
  • 2 sprigs basil, only the leaves
  • 200 g gruyere cheese, grated
  • 200 g mozzarella cheese, grated

Instructions:

  1. Preheat oven to 200 oC Fan.
  2. Place a nonstick pan over medium heat.
  3. Add the olive oil, onion, garlic and thyme.
  4. Stir and add the bacon.
  5. Stir and sauté for about 2-3 minutes, until the bacon becomes crunchy and the onions caramelized.
  6. Add the cherry tomatoes. (You can press them between your fingers when you are adding them or crush them with a wooden spoon to release their juices).
  7. Add the wine, salt, pepper, water and tomato paste.
  8. Stir and boil for 10 minutes, until most of the moisture has evaporated.
  9. Add the penne and basil leaves to the sauce.
  10. Stir until the penne are coated in the sauce and remove from heat.
  11. In an oven proof baking dish, add half of the penned and sauce in one layer.
  12. Add half of the gruyere and half of the mozzarella over them.
  13. Repeat the same process once more.
  14. Bake for 10 minutes, until the cheese melts and turns golden.
  15. Serve with extra basil leaves.

Enjoy!

Recipe from: http://akispetretzikis.com/en/categories/zymarika/penes-foyrnoy-me-tyria-kai-mpeikon

Savory Cake

img_6008

Everyone likes a good cake! They are delicious and they go perfectly with your coffee or tea…But have you ever thought about making a savory cake? Cheese instead of chocolate, salt and pepper, maybe even some meat in the mix… Savory cakes are quick and easy, highly adaptable and, most important, very delicious. They are great for a light lunch served with a little salad or even just a couple of raw carrots on the side.

img_6011

So here is the recipe…

Ingredients:

  • 1 cup smoked turkey, cut into cubes
  • 2 cups cheddar and regato cheese, grated (ideally low fat)
  • ½ cup olive oil
  • 2 cups whole wheat flour
  • 4 teaspoons baking powder
  • 1 low fat yoghurt (200 g)
  • 2 eggs
  • 1 pinch of salt
  • ½ teaspoon pepper
  • 1 pinch of ground ginger

 Instructions:

  1. Preheat the oven to 180 0C.
  2. In a bowl we mix the turkey with cheese, flour, baking powder, salt, pepper, ginger, yogurt and olive oil.
  3. In another bowl, beat the eggs and add them to the first mix.
  4. Grease and flour a loaf tin and pour in the mixture.
  5. Bake at 180 0C, until golden brown (around 50 minutes).

Enjoy!

Tahini and Chocolate Cereal Bars

IMG_5871.JPG

When you are constantly on the go and your mornings are busy, grabbing a cereal bar is an easy, quick and tasty way to have breakfast on the go. Whip up these easy and healthy bars for a good-for-you homemade breakfast or snack. Try them out and they may just convert you from the store-bought kind

Ingredients:

  • 450 g tahini
  • 200 g honey
  • 200 g dark chocolate, chopped into pieces
  • 150 g mixed nuts (pistachios, walnuts, hazelnuts)
  • 150 g cereal
  • 200 g oats
  • 80 g cranberries

Instructions:

  1. Heat the honey in the microwave for 30 seconds.
  2. Combine the tahini and honey together in a large bowl. Be careful not to over mix because it will make the mixture too thick.
  3. Put the chocolate in a bowl. Cover with plastic wrap and melt in the microwave for 2 minutes, set at 800 watts. (Or you can melt it in a bain-marie.)
  4. Add the melted chocolate to the tahini-honey mixture and mix.
  5. Add the oats, mixed nuts and cranberries. Mix with a spatula. Add the cereal and continue to mix by hand.
  6. Spread a very large piece of plastic wrap over a 20×30 cm baking pan, letting it hang over the edges. Spread the mixture over the wrap and sprinkle some more cereal over the top. Cover with overhanging plastic wrap.
  7. Refrigerate for 3-4 hours, until firm.
  8. To serve, cut into 20 equal sized bars, each 5 cm thick.

Enjoy!

Recipe from: http://akispetretzikis.com/el/categories/keik-mpiskota/mpares-dhmhtriakwn

Melomakarona (Greek Honey Cookies)

IMG_5606.JPG

Merry Christmas my friends! Today I have for you a traditional Greek recipe for honey cookies (or as we Greeks call them Melomakarona). As with most holidays in Greece, Christmas also revolves around food with many Greek recipes for dessert, like kourabiedes, diples, vasilopita and of course my all time favourite, melomakarona. Making these sweet little cookies always makes me realize that it’s Christmas time.

Melomakarona are super easy to make, quick to bake and highly addictive to eat (you’ve been warned!!!). Try them out and let the smell of freshly baked cookies, orange and spices fill your house and remind you it’s finally Christmas!

IMG_5603.JPG

IMG_5605.JPG

Ingredients:

  • Chopped walnuts

For the syrup:

  • 500 ml water
  • 800 g. granulated sugar
  • 150 g. honey
  • Three cinnamon sticks
  • 3 whole cloves
  • 1 orange cut in half

Mixture number 1:

  • 400 ml of orange juice
  • 400 ml vegetable oil
  • 180 ml olive oil
  • 50 g. powdered sugar
  • 1/2 tsp clove
  • 2-3 tsp cinnamon
  • 1/4 tsp nutmeg
  • 1 tsp baking soda
  • 2 oranges (zest)

Mixture number 2:

  • 1 kg flour
  • 200 g. fine semolina


Instructions:

For the syrup:

  1. In a pot add all the ingredients for the syrup, except the honey and bring to a boil. Note that you must start the syrup 3-4 hours before you start making the melomakarona so that the syrup can cool completely.
  2. Boil for 3-4 minutes, until the sugar has dissolved, remove from the heat and add the honey. Stir and allow the syrup to cool.

For the melomakarona:

  1. Preheat oven to 190 degrees oC.
  2. Put all the ingredients for mixture number 1 in a large bowl and mix together.
  3. In a second bowl mix the ingredients for mixture number 2.
  4. Add mixture number 2 to mixture number 1 and mix very gently by hand for a short time (maximum 10 seconds).
  5. Layer the bottom of 2 baking trays with baking paper and start shaping the melomakarona.
  6. Pinch a portion of dough about the size of a walnut (30 g. each) and shape with your palms into a smooth oblong shape, like a small egg. Place on the baking tray, push lightly the top with a fork and make some holes on top (not all the way down). Continue with the rest of the dough.
  7. Bake for about 20-25 minutes until crisp and golden.
  8. Once ready, place them in the cold syrup and leave for 10-15 seconds. Place them on a platter and sprinkle with honey and chopped walnuts.

 Enjoy!

Gingerbread Cookies

IMG_5556.JPG

It’s the most wonderful time of the year! Christmas decorations and lights everywhere, warm red wine with spices (gluhwein) and Michael Buble’s Christmas album on repeat…and gingerbread cookies of course!

These traditional spice cookies are just right for the holidays, because no holiday cookie platter would be complete without gingerbread cookies. This classic recipe is one of my favorites for the holidays, because it is easy and fills my house with the best-ever aroma. Plus, it makes a lovely homemade Christmas present!

And if you are not feeling very Christmassy yet, you should definitely try them…they will have you feeling more festive immediately.

IMG_5538.JPG

IMG_5554.JPG

 Ingredients:

  • 350 gr plain flour
  • 1 tsp ground ginger
  • ½ tsp ground cloves
  • ½ tsp ground cinnamon
  • 1 tsp bicarbonate of soda
  • 100 gr butter
  • 175 gr soft brown sugar
  • 1 egg
  • 4 tbsp Golden Syrup

Instructions

  1. Preheat the oven to 180°C/ gas mark 5.
  2. Mix together the flour, spices and bicarbonate of soda.
  3. Rub in the butter until it looks like breadcrumbs.
  4. Add the sugar.
  5. In a separate bowl mix together the egg and the golden syrup then add to the dry ingredients.
  6. Mix together until it forms a dough. Tip out a clean, floured work surface and knead for a minute or two until it is smooth.
  7. Roll out the dough to the depth of approximately 5mm and cut out shapes with your cookie cutters.
  8. Lay the biscuits on a greased baking tray and bake for 10-15 minutes until golden brown.
  9. Leave on the baking tray until cool. Once cooled, decorate with icing.


Enjoy!

Corn Dogs

IMG_5172.JPG

Everyone loves upscale street food, especially when it’s easy to make at home. So today I have for you a delicious recipe and the perfect snack for parties, the famous Corn Dogs!

A corn dogs is a sausage (usually a hot dog) coated in a thick layer of cornmeal batter on a stick. They are often served as street food or as fast food. But be not afraid my friends!….Now you can cook your own home made corn dogs like at the carnival with this easy recipe that take just minutes to make.

Ingredients:

  • 6-8 Frankfurt sausages
  • 220 g. flour
  • 210 g. corn flour
  • 1/4 teaspoon baking soda
  • 35 g. sugar
  • 2 teaspoons salt
  • 1 teaspoon baking powder
  • 1/2 teaspoon pepper
  • 360 ml milk
  • 2 eggs
  • 1 liter oil for frying

To serve:

  • Skewers
  • Ketchup
  • Mustard


Instructions:

  1. Firstly cut the sausages in half, thread your sausages on the skewers and set aside.
  2. Into a bowl pour all the dry ingredients (flour, corn flour, baking powder, sugar, salt, baking soda, pepper) and mix.
  3. In the same bowl pour the milk with the eggs and mix so as to have a porridge neither too tight nor too dilute.
  4. Put the oil to burn in a wide pan or pot to fit the skewers.
  5. Dip in the batter one by one the sausages until covered.
  6. Put one sausage into the oil holding the stick until shortly cooked the edge of the dough and start to float.
  7. Then leave and repeat the same with the next.
  8. Stir constantly into the oil to get a golden color around.
  9. It takes about 2-3 minutes.
  10. Serve with ketchup and mustard.

Enjoy!

Apricot Jam Tart

IMG_1220.JPG

Afternoon coffee is just not the same without this Apricot Jam Tart or Pasta Flora as we call it here in Greece. This super simple jam tart is made with a quick crust that’s filled with fruit preserves. If you don’t like apricot, you can swap it for any other fruit jam you love. It’s a great recipe for dessert and perfect for spoiling family and friends. Please try it and send me your photos of the recipe…I’ll be waiting!

IMG_5287.JPG

Ingredients:

  • 4 cups plain flour
  • 1 teaspoon baking powder
  • 6 tablespoons sugar
  • 250 g. cold unsalted butter
  • 2 eggs
  • 2 tablespoons brandy
  • 2 cups apricot jam

Instructions:

  1. Heat oven to 180 °C. Coat a tart pan with cooking spray or a little butter.
  2. In a small bowl, whisk together the egg yolks and the brandy; set aside.
  3. In a food processor pulse the flour, baking powder, sugar and butter and pulse until the mixture is crumbly.
  4. Add the egg yolk mixture and pulse until the mixture is combined, forms large clumps and holds together when squeezed.
  5. Press 2⁄3 of the dough into the bottom and up the sides of the tart pan.
  6. Spread the jam evenly into the tart shell.
  7. On a lightly floured surface, roll the remaining dough into thick strips. Place 5 strips on top of the jam mixture, spacing them about 3 cm apart. Place 5 more strips diagonally across to make diamonds.
  8. Bake until golden brown, 30 to 35 minutes. Serve warm or at room temperature.


Enjoy!

Cheese and Pesto Rolls

IMG_5269.JPG

On Saturday I invited some friends over and we decided it was time to decorate the house for Christmas. The decoration actually turned into a party, filled with Christmas songs, wine and lots and lots of food. I decided to make something easy and tasty like these cheese and pesto rolls. I love pesto and I always have a jar of pesto in my fridge. I usually stir it through a bit of pasta, but I wanted to try something different. The rolls were extremely popular yesterday and they’ve got the perfect flavor combinations. So here is the recipe…

Ingredients:

      For the pesto:

  • 50 g. fresh basil
  • 1-2 cloves garlic
  • 20 g. pine nuts
  • 20 g. cashew nuts
  • 6 tablespoons extra virgin olive oil
  • 2 tablespoons grated parmesan cheese
  • salt
  • pepper

      For the dough:

  • 520 g. flour
  • 300 g. fresh milk 3.5% fat at room temperature
  • 60 g. melted butter
  • 1 packet of dry yeast ( 8 g.)
  • 20 g. granulated sugar
  • 10 g. salt
  • 50 g. grated parmesan cheese
  • 200 g. grated gruyere cheese
  • fine semolina for opening the dough


Instructions:

    For the pesto:

  1. Put all the ingredients, except the parmesan cheese, in a food processor and beat thoroughly until you have a pulp of the whole mixture.
  2. Finally add the Parmesan and beat some more.
  3. Taste if you need something and add.
  4. If the mixture is too dense add a little olive oil.

     For the dough:

  1. Preheat our oven at 50 ° C, air.
  2. In the mixer, add the milk, yeast and sugar and mix with the whisk. At this point let the yeast rise for 15 minutes.
  3. Pour the flour and beat in the mixer for 4-5 minutes.
  4. Then add the parmesan cheese, 1 pinch salt and the butter (soft or melted) and beat with medium-high speed.
  5. After 2-3 minutes, put the dough in a bowl and leave in a warm place (in the oven), for about 1 hour, until doubled.
  6. Pour a little fine semolina on your work surface and with the help of a rolling pin roll out the dough. The dough will become thin and should get a rectangular shape of about 40-50 cm.
  7. Pour the pesto and spread it on your dough with the back of a spoon.
  8. Scatter 100 g of the gruyere cheese.
  9. Roll the dough into a roll and close the tip thoroughly with a little water.
  10. Cut your roll into 12 equal sized rolls.
  11. In a greased baking tray (25 x 35 cm), covered with parchment paper, put the rolls. Pour the remaining cheese on top, a little semolina and a little oil.
  12. Put the tray in the oven at 50 degrees and let the rolls rise for 20 minutes.
  13. After 20 minutes without opening the oven, raise to 180 ° C and bake for another 20 to 25 minutes, depending on the oven until browned on bottom.

Enjoy!

Recipe from: http://akispetretzikis.com/el/categories/snak-santoyits/rolakia-pestoy